Showing posts with label vegetarian. Show all posts

Monday, May 05, 2008

Vegetarian Challenge Results

Vegetarian challenge chart


April's challenge was to eat a vegetarian meal a week. 176 people voted in the poll and the results were as follows:
  • I'll have a vegetarian meal each week! 13% (23 votes)
  • I already eat vegetarian at least once a week! 65% (115 votes)
  • Life without bacon is not worth living! 9% (16 votes)
  • I'm 100% vegan! 12% (22 votes)
Thanks to everyone who voted. I hope those of you who took up the challenge enjoyed your vegetarian meals, and keep up the habit of having a meat-free dinner once in a while.

A new challenge for May will be posted soon.

Monday, April 21, 2008

Roasted Vegetables and Goats' Cheese Pasta

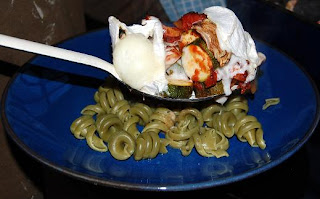
Roasted Vegetables and Goats' Cheese PastaHere's another vegetarian recipe my sister Stephanie rustled up whilst she was visiting.


Roasted Vegetables and Goats' Cheese Pasta

Chop up a bunch of vegetables for roasting. We used courgettes, aubergines, red peppers and red onions. That was neither seasonal nor local for us at this time of year (slaps own wrist). But if you wanted you could roast onions, leeks, carrots or whatever seasonal vegetables you can get hold of. Personally I don't think I ever met a vegetable I wouldn't like to roast, so this recipe is the ultimate movable feast. Toss your vegetables in olive oil, add some sliced garlic, some fresh or dried herbs, and bung in a hot oven for a while. Sorry about the lack of precise weights, temperatures and times - regular readers will know by now that I just don't usually cook like that. I encourage you to experiment, to make use of the ingredients you have available, and to learn for yourself what ingredients work well together, how your own oven behaves, and to take food out of the oven or the pan when it is ready, not when your timer goes beep.

When the vegetables are almost roasted (which after all will depend on exactly which vegetables you use), put some pasta on to cook. I like quite chunky pasta with a chunky sauce like this one. I wouldn't use tagliatelle for example. We had some spinach trotolle from Seeds of Change that worked very well. When your pasta comes to the boil, stir a tin of chopped tomatoes into your roasted vegetables, arrange a sliced soft goats' cheese on top, and return to the oven for the cheese to melt. Steph used one of those little chevre cheeses between two of us. If you're cooking for more than two, use more cheeses. If you have some help in the kitchen, get someone else to bung a garlic ciabatta in the oven, rustle up a quick salad, and open a bottle of wine. If it's just you, open the wine and forget about the salad and ciabatta. By the time the pasta is cooked, the cheese should be melted. Serve the vegetables and cheese on top of the pasta, with the garlic bread and salad on the side if you have them, and a nice glass of wine. Lovely.

If you make this dish as part of our Try A Vegetarian Meal Challenge, let me know how it turns out. And don't forget to vote in the poll in the right-hand sidebar.

Thursday, April 17, 2008

Fried Halloumi with Redcurrant Chili Sauce

Fried Halloumi with Redcurrant SauceOne of the nice things about having my sister Stephanie staying with me is that I eat better, especially at lunch times. I usually just grab anything quick for lunch, but I make more of an effort when other people are here. Steph has been doing a lot of the cooking, too, and todays lunch was a bit of a joint effort.

Fried Halloumi with Redcurrant Chili Sauce

Assemble some salad ingredients on a plate. We had lettuce, radishes, spring onions and red pepper in the fridge, but you should use whatever you've got. Slice a halloumi cheese and dip the slices into a beaten egg and then into wholemeal breadcrumbs to coat. Fry the slices in olive oil until golden, then put them onto the salad. Thin some redcurrant sauce with some red wine. Or you could use mango chutney, apricot jam - just have a rummage in your cupboards for something fruity that might go with fried halloumi, and be adventurous. If you don't have red wine to hand, thin it out with wine vinegar or water or apple juice - use your imagination. Add half a chopped chili to the sauce (or some dried chili, or a few drops of Tabasco sauce - you get the idea). Warm up the sauce in the same pan you used for your cheese, then get your arty sister to drizzle it artistically over the top. Serves 2 for a delicious and companionable lunch.

Why not try this recipe (or your own variation of it) as part of April's Try A Vegetarian Meal Challenge?

Thursday, April 03, 2008

Try A Vegetarian Meal Challenge

wartime poster save scraps to feed pigsIt's often said that if you're really concerned about your impact on the planet - in terms of carbon emissions, pollution, sustainability and so on - you should become a vegetarian. For example GoVeg.com says:
The best thing that any of us can do for the environment is to adopt a vegetarian diet.

It's also argued that it is inefficient to grow crops to feed to animals to eat their meat, milk, eggs, etc, rather than just grow the crops to feed the people. Greenpeace USA says:
It takes up to 10 pounds of grain to produce just one pound of meat. ... The world’s cattle alone consume a quantity of food equal to the caloric needs of 8.7 billion people — more than the entire human population on Earth.

But I'm not totally convinced. Just east of where I live is Derbyshire, a rocky county of low mountains and fells. It's sheep-rearing country, because nothing else can thrive there. Dry-stone walls separate the fields, not because they look picturesque, but because even hedges won't grow reliably on the thin soil and the wind-blasted hills. If you didn't farm sheep there, you wouldn't farm anything.

In the book The New Complete Guide to Self Sufficiency, John Seymour strongly advocates keeping a cow on any smallholding, even one as small as a single acre, primarily because of its fertility-generating properties (he means dung). Pigs are also prized by smallholders as the rapidest of compost-making systems. You put food scraps, vegetable trimmings, windfall apples and so on in one end of the pig, and within 24 hours fertiliser comes out of the other end. And you get to eat the pig. It's a win-win situation.

Of course, most of the meat you buy in supermarkets isn't produced this way. Too often it is produced intensively. They call them farms, but really they're much more like factories. And they do produce horrendous amounts of pollution, they rely on enormous quantities of grain and soya and water, and the animal welfare is non-existent.

So I'm not asking you to become a vegetarian. I don't think it's necessary, and I don't think you would do it anyway just because I asked you. I'm asking you, this month, to have a vegetarian main meal once a week. Don't give up meat, but do eat less meat. If you know somewhere you can get well-produced meat, perhaps from a farm shop or a farmers market (don't assume all farm shop or farmers market meat is well-produced - talk to the butcher and ask lots of questions) then please use that rather than the supermarket.

I'll be posting lots of simple and tasty vegetarian recipes this month. Please email me your favourite vegetarian main meals. And I'll be talking about the environmental impact and ethics of meat eating. If you're up for the challenge of eating four vegetarian main meals in April, please vote in the poll in the right-hand sidebar.

Saturday, December 15, 2007

Sourdough Latkes

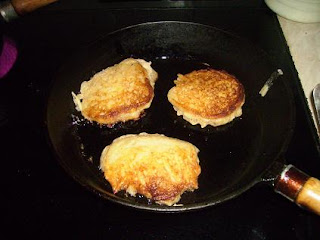
sourdough potato latkesOne of the nice things about baking sourdough bread daily is that you always have a dish of sourdough starter hanging about. Sourdough starter is flour and water which is fermenting - in other words, it's batter. So you can quickly cook anything that requires batter. I already posted a recipe for sourdough pancakes. I forgot to photograph my sourdough onion rings, but next time I make them I'll tell you all about it. I've plans to make sourdough apple fritters sometime soon. But today I want to show you my sourdough potato latkes.

It's basically the same recipe as the potato latkes I blogged about in July:

Grate two pounds of peeled potatoes and soak in cold water for at least a couple of hours. Strain the potatoes and dry them well, for example by wrapping in a tea towel and swinging them round your head. Do this outdoors. And don't blame me if you accidentally let go of a corner and decorate your garden with grated spuds. If you're chicken you could just pat them dry between sheets of kitchen paper. Put the potatoes in a large bowl and add a grated onion and plenty of freshly ground black pepper and sea salt.

But then instead of making batter from scratch, I took a cup and a half of sourdough starter. I added a beaten egg, a splash of milk and half a teaspoon of bicarbonate of soda. I mixed the spuds with the sourdough batter, then fried dessertspoonsful of the mixture in butter, in a frying pan.

You can serve them as a side dish with roasted stuffed butternut squash, as I planned to do. But apparently they taste better red hot from the pan, stolen from the cook, and eaten with your hands burning your fingers in the process.

Friday, October 26, 2007

Recipe: Cheesey Bread Pudding

I love traditional bread-and-butter pudding with raisins and nutmeg, all hot and gooey and served with custard. This is a savoury variation that makes a delicious and cheap vegetarian main course.

Cheesey Bread Pudding

Butter 8 slices of bread and make sandwiches with grated mature cheese and sliced onion. Quarter the sandwiches and arrange in a baking dish. Feel free to vary to contents of the sandwiches. If it doesn't have to be a vegetarian dish, some ham would be very nice. Or you might want to put some pickle on the sandwiches, some sliced tomatoes, cooked sausage or whatever you fancy.

Beat 2 eggs with some milk, salt and pepper, and any other flavourings you like. I just rummage through the cupboards and see what I fancy - sometimes it's a generous helping of mixed dried herbs, or I might grab some fresh herbs from the garden. Or I might go for mustard powder, tabasco, or horseradish if I feel like something a bit spicy. It's up to you. It's that sort of recipe. You need plenty of liquid though, so add more milk until you think you have enough mixture to soak the sandwiches thoroughly. I reckon about half a pint or so.

Pour the flavoured eggy mixture over the sandwiches. If you had any cheese leftover, sprinkle it on top. Onion, too if you have any. Now bung it in a moderate oven for 25 minutes or so, until the eggy mixture has set and the cheese on the top is golden.


In a nutshell - it's cheese sandwiches with savoury custard poured over then baked in the oven. Now you know how to do it, go and invent your own family's favourite version.

Tuesday, October 23, 2007

How To Make A Bean Sprouter

Here's how to make a bean sprouter out of an old jam jar.

1. Start with a clean jam jar. Go for one with a plastic lid if you can, because it's going to be in contact with water a lot so a metal one will rust.


2. Get a piece of wood that fits inside the jam jar lid, and make a hole in the lid with a hammer and nail. You're just trying to make lots of holes in the lid. The wood is there because if you knocked the nail into the unsupported lid, it would just smash.

3. Make lots of holes. If you can be bothered to mark out a symmetrical pattern in advance - you're nuts.

4. Really, make lots and lots of holes. Water will drain through these and it's tiresome if it drains slowly. Make plenty of good-sized holes.

5. That's it. You've made your sprouter. Now to sprout some beans in it. Put about two tablespoons of mixed dried beans or seeds in the sprouter. Beans I like to sprout include:
  • mung beans
  • chickpeas
  • alfalfa seeds
  • mustard seeds
  • fenugreek seeds
  • aduki beans
  • soya beans
  • black-eyed peas
  • sunflower seeds
  • wheat grains
  • green and black lentils (not red)
  • buckwheat

6. Cover the beans with plenty of water (fill the jar to the top with water) and replace the lid. Leave on the kitchen windowsill overnight. The beans will swell a lot.


7. In the morning, drain the water by upending the jar on your draining board. All the water will run out of the holes you made. You'll be grateful you made plenty of holes.

8. Two or three times a day, pour clean water into to jar, swill your beans and drain them.


9. In a few days time the beans will have sprouted. When the little sprout is about the same length as the bean, they're ready to eat. If you don't want to eat them straight away, put them in the fridge which will stop the sprouts sprouting and keep them fresh.

You can buy sprouters of course. They cost up to £20. Actually the £20 one is probably worth it. It's made of terracotta and it's beautiful. What I find pretty shocking is that for £5 plus P&P you can buy a sprouter that's exactly the same as the home made one in the project.

Monday, October 22, 2007

Soda Bread Recipe

This is the bread recipe for people who are scared of breadmaking. That's because it's not actually bread at all, it's really more like a great big scone. It's quick and easy and really pretty foolproof.

Soda Bread

Dump about 1lb of wholemeal flour (not strong bread flour, just regular baking flour) in a large mixing bowl, add 2 tsps of bicarbonate of soda, 2 tsps cream of tartar (or you could add 4 tsps of baking powder instead of the bicarb and cream of tartar, and if you don't have any cream of tartar, don't worry about it just go ahead and make the recipe anyway with bicarb only) a good grinding of sea salt and 2-4 tsps of brown sugar if you have it.

Mix it all together with your hands, and then add about half of a half pint of milk, stirred yogurt or buttermilk (who has buttermilk nowadays? If you have it, use it, but otherwise just use milk. Oh, and if you didn't have cream of tartar or baking powder, be sure to use buttermilk or yogurt at this stage. If you just have bicarb on its own and plain milk then your bread won't rise. It will still taste good, but it will be very dense and chewy). Mix the flour and liquid together and add more liquid until you have dough. Feel free to add a bit more liquid than I said if that's what's needed to make dough, and if you overdo the liquid, work in a bit more flour. It's not a fussy recipe. As long as you have a ball of dough you're doing fine.

Shape it into more-or-less a ball and plonk it on a greased baking sheet. Sprinkle a few porridge oats on the top if you like (you can add a couple of handfuls of porridge oats to the flour next time if you feel like a change). Make deep cuts in the top, as if you were thinking of cutting it into quarters but changed your mind. Then bake it in a moderate oven until it is done. It will puff up and come apart at the cuts you made, which makes it easy to tear into chunks with your hands. Soda bread cut into neat slices with a knife makes me laugh. I would look at it after about 30 minutes, and take it out and tap it on the bottom. If the top looks cooked and the tap sounds hollow I would call it done, but if the top looks pasty and the tap sounds dull I'd give it another 5-10 minutes.

Thursday, October 18, 2007

Can I Eat Bean Sprouts During Pregnancy?

Someone found this blog by searching google for the phrase "Can I eat bean sprouts during pregnancy". Seems like a funny question, but I suspect it's related to a health scare in Toronto when a number of people were infected with salmonella from eating bean sprouts.

Most people who are infected with salmonella will get over it, although they'll have vomiting and diarrhoea and feel extremely rough. But the very young, the very old, immune compromised people and pregnant women may be more severely affected and can die, so it's not to be taken lightly. Good hygiene that we all know about helps prevent its spread - washing hands, cleaning work surfaces, keeping fresh food refrigerated, cooking meat, eggs and chilled or frozen foods thoroughly etc.

There seems to be no particular reason why bean sprouts would harbour salmonella more than any other food. This isolated case in Canada seems to be a freak, rather than a timely warning that we should all avoid those dangerous killer alfalfa sprouts. The usual advice on salmonella says "Cook foods thoroughly", but that's very confusing. Does it mean we shouldn't eat salad? How about fruit? It's this kind of thing that helps drive people to ready meals and hamburgers because they're scared of eating fresh healthy food like bean sprouts and eggs.

For example, a few years ago seven people in the UK died from legionnaire's disease traced to an arts centre. But of course that doesn't mean arts centres are dangerous. A badly-maintained air conditioning unit was the cause. Similarly, it doesn't seem justified to point the finger at bean sprouts in general just because they were linked to this outbreak in Toronto. Poor food hygeine at some stage must have been the cause. And if that happens again, next time it could strike spinach, or apricots, or watercress, or anything else. When you think about it like this, it seems crazy to avoid bean sprouts.

I'm not a doctor, I'm not a biologist and I'm not the FDA. But I'd say bean sprouts are one of the healthiest things you can eat. If you're pregnant or immune compromised and you'd really rather not risk it, then I respect that. But what are you going to eat instead? Are you going to ask the restaurant to serve your salad without bean sprouts? If the restaurant has poor kitchen hygiene, you could still get sick from the uncooked lettuce and tomatoes. If you are going to opt for a BLT from the sandwich place rather than a salad sandwich with beansprouts, aren't you worried about all the saturated fats, salt, nitrates and so on in the BLT, not to mention that uncooked lettuce and tomato again? I think the salad is the healthier option, even with the bean sprouts. What do you think?

Wild Mushroom Soup Recipe

Wild Mushroom Soup

I didn't collect enough shaggy ink cap mushrooms to make a whole batch of soup, so I stretched them with some shop-bought mushrooms. This recipe works well with bog-standard shop mushrooms, shop-bought exotic mushrooms, or wild mushrooms. But you do need plenty of them. Fry a finely chopped onion and one or two crushed garlic cloves in a little olive oil. Add plenty of chopped mushrooms. They shrink down a lot as they cook, so add more than you think you need. When they mushrooms have darkened and shrunk, cover with milk. Add a bay leaf and simmer for a while. Keep your eye on the pan so the milk doesn't boil over. I left it to simmer very gently whilst I made some soda bread.

When you are almost ready to serve the soup, liquidise about half of it and add the pureed soup back to the chunky soup. I don't like totally smooth mushroom soup, but it's a bit watery just as it is. This step thickens the soup without adding anything gloopy like cornflour. Now taste the soup and add a little sea salt and freshly ground black pepper. Add a good slug of cream (or creme fraiche etc.) If you have any Madeira or port knocking about, a slosh of that wouldn't do any harm either. A garnish of finely chopped chives finishes the job. Serve with your soda bread which should be ready about now.

Wednesday, October 10, 2007

Recipe - Cheesey Number Sixes

... or sevens, threes, thirty-fives, or anything else.

This is the recipe I use to make cheese straws in the shape of numbers for birthday parties. Kids like them, the dough is easy to roll and cut with novelty cookie cutters, and being a wholefood recipe it's even moderately healthy, for party food.

Cheesey Number Sixes

Rub 2oz butter into 4oz self-raising wholemeal flour with some salt and a pinch of mustard powder. When it is the texture of breadcrumbs, add 3oz grated mature cheese, and a beaten egg. Bring it together with your hands into a lump of dough. Roll out and cut into numbers with shaped pastry cutters (we got a set of 99 pastry cutters from Lakeland and it's one of the best things we ever bought, I use them all the time), or make a paper template and cut around that with a pointed knife, or cut long strips with a knife and shape them into numbers. Place them on a greased baking tray and bake in a moderate oven until they're golden (about 10 minutes).

Saturday, September 08, 2007

Black Forest Gateau

Black Forest Gateau

Separate 6 eggs. Beat the yolks until they thicken and become pale, then add 5oz sugar and continue beating until they thicken even more (but stop short of turning them into stiff glue). Now beat in 2oz cocoa powder until well mixed. Beat the egg whites until they form soft peaks. (If you only have one egg beater, you must wash the beater scrupulously in hot soapy water and dry well after beating the yolks. If your beater has the least bit of grease on it, the whites will never peak). Gently fold the chocolate mixture into the egg whites. This is the skillful bit, because they need to be well mixed but you don't want to knock all the air out of the beaten whites. Spread the mixture into two 9" loose bottomed cake tins, greased and floured, then bake at 180C/Gas 4 until the cakes are risen and springy, about 15 minutes.

Let the cakes cool, then place one on a serving plate and spread a small jar of home-made cherry jam all over it. Smother the other cake with whipped cream and carefully sandwich on top of the first cake. Cover the lot with more whipped cream, and sprinkle some grated dark chocolate on top for decoration.

If you "don't like black forest gateau", try this anyway. It's not like the Tesco version, I promise.

Wednesday, September 05, 2007

Chutney

If I've persuaded you to try your hand at chutney, you'll need a recipe. So here's one (sort of):

Basic Chutney Method

Wash every empty jam jar you own (and go through to cupboard looking for jars that are almost empty and deciding you never liked that sort of jam anyway so you can "claim" the jar) really well, then place them upside down on a baking sheet and put in a low oven to dry out and sterilise.

Finely chop about 5lbs of vegetables (such as tomatoes, courgettes, runner beans, carrots - whatever you've got a lot of) 2 or 3 lbs of apples and one pound of onions. Put these in the largest pan you have with a pound of dried fruit of some sort (raisins, sultanas, chopped prunes, it's up to you), a pound of sugar and 1 1/2 pints of vinegar (don't use malt vinegar if you can help it or your chutney will taste of malt vinegar and not much else). Mix well and bring to a simmer.

Whilst you're going that, place a bunch of whole spices (such as a few whole cloves, peppercorns, cinnamon sticks, mace, fresh ginger, whatever you like) in a muslin cloth and tie up well, then dunk it in the chutney and let the flavours seep out.

Feeling nervous? Don't be. Chutney can't really go wrong unless you burn it. It's not like jam or a souffle - it can't fail. I promise. All you're doing is slowly cooking the ingredients down to a thick gloopy mush. You can taste it as you go along, and if you think it needs a chili kick, add some chili. If you think it's too vinegary, add a bit more sugar. Too sweet? Add more vinegar and salt.

It needs to simmer on a low heat for at least an hour or two. You don't need to stir constantly, thank God, but you can't totally desert it or it will burn. It's ready when it's thick and looks like chutney. I told you it was easy.

Now get it into the jars and screw the lids on. It needs to mature for at least a month or two. Before that it will still taste rather vinegary but after maturation it will be smooth and all the flavours will mingle together. Think of an appealing name for your chutney, and be creative - gooseberry and ginger sounds nice, but runner bean and swede isn't so alluring. So if your main ingredients are prosaic you'll have to call it something like "Taste of Autumn Relish", or "Poynton Farmhouse Chutney", or "Mel's Spicy Preserve".

It keeps forever in an unopened jar. Once you've opened it - honestly I've no idea. I've never seen a jar of homemade chutney go off, but I've never seen a jar of homemade chutney last more than a couple of weeks, so the point is moot.

Monday, September 03, 2007

Top Ten Reasons to Make Chutney

1. They taste great with cold meats, in cheese sandwiches, or with a pork pie

2. It's really easy. Honest. I know some people are preserve-phobic but there's no need to be

3. Home-made chutney makes a great Christmas present, thank-you gift, welcome-new-neighbour gift, I'm-sorry-my-bees-attacked-you-and-stung-your-dog peace offering etc.

4. Your friends and neighbours are avoiding you in case you give them any more runner beans or courgettes, but you need to use up the surplus veg somehow

5. Not everything is cheaper to make than to buy, but chutney is (especially if you're using up home-grown gluts or hedgerow forage)

6. You cannot buy anything in the shops that's nearly as good as home-made chutney

7. Have you read the ingredients label on shop-bought chutney?

8. You can get creative in so many ways - different herbs and spices in the recipe, fancy labels, little fabric hats and ribbons. It's great fun

9. They always go really well at Christmas fairs, summer fetes and other fund raising events

10. There's nothing like the feeling that a well-stocked store cupboard gives you, especially when the contents are home-made

Tuesday, July 31, 2007

Butter Making

Butter is easy to make in small quantities, and a lot of fun. We bought some double cream a few days ago (you can't make butter with really fresh cream), then poured it into a huge jam jar and took turns shaking it. Don't fill your jam jar - it needs lots of room to "slosh" so you should have it less than half full.

It can take any time between 10-30 minutes to become butter so it's better if you have lots of people willing to take turns shaking the jar. After a while the cream stops going "slosh slosh" and becomes silent. At this stage you have whipped cream. Keep shaking. Some time after that it suddenly goes "thud thud". Now you have a pat of butter in a puddle of buttermilk and you can stop shaking.

There's more work to be done. The buttermilk will turn your butter rancid quickly unless you can separate it all away from the butter. So pour the puddle of buttermilk into a cup and save it, but there is more buttermilk trapped inside the butter, like a sponge. Fill the jam jar with clean water, slosh it around, then pour the water away. Keep doing this until you have washed the butter clean. Now turn your pat of butter onto a wooden board and squeeze it with your hands to get the trapped buttermilk out. When you have pure butter you can stop.

You can use the buttermilk to make soda bread or scones and then spread the butter on them. If you have any home made jam as well, you're in for a feast.

Friday, July 27, 2007

Tea Time

Mel's Muffins

Sift 10oz wholemeal plain flour with a pinch of salt and a tablespoon of baking powder. Beat 2 eggs, half a pint of milk and 4oz melted butter together in a large bowl then fold in the flour gently. Add 3oz sugar, 1 teaspoon vanilla essence and something else, such as:
  • chocolate chips

  • chopped apple and mixed spice

  • lemon rind and poppy seeds

  • fresh berries, such as blueberries, raspberries, chopped strawberries etc.
You can really make it up as you go along.

Drop dollops of the mixture into cake cases or holes in a muffin tin. Bake in a moderate oven (about Gas 6/200degrees C) until they're done (it depends on the size of your muffins - 10-15 minutes for little ones, 20-25 minutes or so for huge ones).

Rich Scones

Sift 8oz organic self raising flour with a pinch of salt. Rub in 2oz butter and stir in 1oz sugar and 2oz sultanas. Beat an egg in a measuring jug and add enough milk to make 1/4 pint of liquid. Mix the liquid with the flour and butter mixture until it forms a stiff dough. Roll it out and cut it into dinky little circles. Brush the top with the leftover egg and milk mixture and bake on a greased baking sheet in a moderate oven until the tops are golden (about 10 minutes). Serve warm with Steph's homemade hedgerow jelly and extra thick double cream.

Serve on your beautiful home-made recycled cake stand.

Saturday, July 21, 2007

Potato Latkes

Grate two pounds of peeled potatoes and soak in cold water for at least a couple of hours. Strain the potatoes and dry them well, for example by wrapping in a tea towel and swinging them round your head. Do this outdoors. And don't blame me if you accidentally let go of a corner and decorate your garden with grated spuds. If you're chicken you could just pat them dry between sheets of kitchen paper. Put the potatoes in a large bowl and add a grated onion and plenty of freshly ground black pepper and sea salt. In a separate bowl, beat two eggs with two tablespoons of wholemeal self raising flour. Mix the egg mixture into the potato mixture.

Cook spoonsful of the potato batter in a frying pan with hot butter or oil. Serve hot.

They taste fantastic, especially when made with home-grown potatoes and onions and home-produced eggs.

Friday, July 06, 2007

Recipe: Lemon Meringue Pie

Here it is, as promised - a recipe for the best ever lemon meringue pie. I know it looks long but trust me, it's really easy.

Step 1: The pastry shell. You can use your own shortcrust pastry recipe, or ready-made pastry or a ready-made pie shell. Here is my favourite shortcrust pastry recipe for when I'm really pushing the boat out. It makes the best ever mince pies, for example. Sift 7oz plain flour into a bowl with ½ teaspoon of salt. Make a well in the centre. Add 4oz diced softened (really soft) unsalted butter, 2oz caster sugar, 4 egg yolks and ½ teaspoon vanilla essence into the well and then rub in. In fact I usually heave it all into my food processor with a dough hook attachment and let it run until it looks like pastry. Bring it together into a ball and knead it lightly, then wrap it in clingfilm and chill it for at least half an hour before using.

Roll it out, but it's a b****r to handle, so if it falls apart when you try to line your greased 9-10” pie tin with it, don't panic. Just smoosh it back together with your knuckles, and feel free to cover any holes with leftover bits of pastry and work them in until you can't hardly see the join no more. Stab the bottom with a fork a few times, put a sheet of tin foil inside and fill with blind baking beans, dried chickpeas, or whatever you can find to weigh it down evenly. Then bake at 200°C, 400°F, gas 6 until golden brown and set aside to cool. Turn the oven down to 150°C, 300°F, gas mark 2 whilst you sort out the filling.

Step 2: The lemon filling. You can use a jar of Hedgewizard's lemon curd, but if you're making the lemon filling just for the pie it's more economical to use a slight variation: separate 3 eggs. The whites will become the meringue, the yolks become the lemon curd. Put the yolks in a pan with the juice of 2 lemons, 3oz sugar, 2oz butter and a tablespoon of cornflour. Heat over a moderate heat whilst beating all the time until the mixture thickens. Then quickly pour it into the prepared pie shell.

Step 3: The meringue. Whisk 3 egg whites until they form stiff peaks. Gradually beat in 6 oz of caster sugar, then spread the mixture all over the lemon pie filling. It's important to spread it right to the edges and seal in the filling. Don't be too neat smoothing down the top - I like quite a spiky meringue topping. Bake at 150°C, 300°F, gas mark 2 (you did remember to turn the oven down, didn't you?) until the outside of the meringue has turned sort of beige in places. It takes quite a while - meringues dry out slowly in the oven rather than bake. We're talking at least half an hour, perhaps more.

The meringue will be squidgy in the middle. It's supposed to be. Those meringues you get at the shop that are crispy all through like styrofoam, they're made differently with boiling sugar syrup and all kinds of messing about. Don't pay them no mind.

Eat your pie hot or cold. I prefer it cold. It doesn't need cream or ice cream or anything else. It is perfection; complete just the way it is. My sister, Steph, used to make individual mini lemon meringue tarts and they were really nice. The recipe is exactly the same but you'd cut small circles from the pastry and bake them for a shorter time in a jam tart pan (don't worry about the blind baking beans, but do prick the bottoms or they might puff up), then fill with little dollops of lemon curd and meringue mix, and bake them for a shorter time, until they turn beige.

Wednesday, June 27, 2007

Lemon Curd


I made some lemon curd using Hedgewizard's recipe. Thanks, Hedgie, it's delicious and sooooo easy - you all must try it. Suitable for the preserve-challenged; forget massive cauldrons full of boiling hot jam, special thermometers and getting the whole kitchen covered in sticky goo. The whole process takes about 10 minutes from thinking "Hmm, maybe I'll make some lemon curd" to admiring your finished jar of golden yumminess. Plus it uses ingredients you probably have knocking around anyway - lemons, eggs, sugar, butter and cornflour. Finally, there's no problem with small batches. Just make a single jar if that's all you need.

Recipe for lemon meringue pie coming soon...

Monday, May 28, 2007

Tagliatelle Primavera

One of my favourite seasonal recipes is pasta primavera - fresh in-season veggies (from the allotment or vegetable garden if you can manage it) with pasta and a light creamy sauce. It's very quick and simple to make. Serve with a huge garden salad and a glass of white wine, and you will be full of the joys of spring.

Tagliatelle Primavera

In a huge pan of boiling water, add some tagliatelle (I use about 100g per person, judged by eyeball). Bring it back to the boil and wait a few minutes before adding broad beans, asparagus, garden peas, spring onions and whatever in-season fresh green veggies you can lay your hands on. In another pan, gently warm some crushed garlic with some cream (or home-made yogurt, creme fraiche, sour cream, fromage frais, smetana or any other creamy stuff you happen to like or have available. Don't over-heat cultured milk products or they could separate, but if this happens you may be able to rescue them by quickly stirring in a spoonful of cornflour). Drain the pasta and vegetables when cooked, and toss in the cream. Add freshly ground black pepper, and serve with salad and chilled white wine. Eat outdoors if you can manage it, with a red checked tablecloth.